Three Tier Web Application
By Sotee Loey on Mar 21, 2024

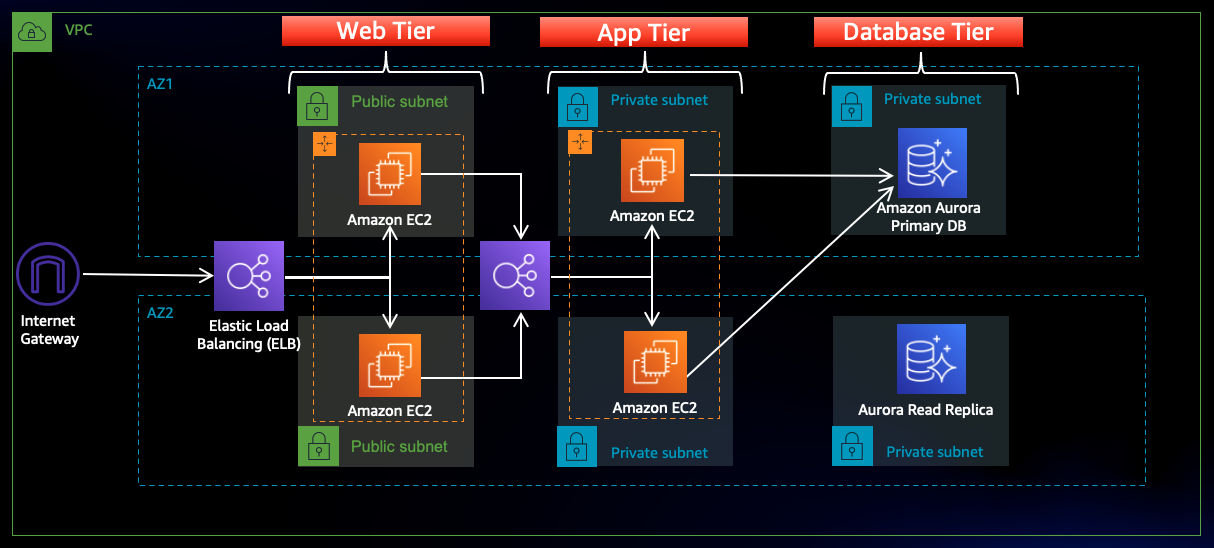
In this AWS project, I configure and deploy phpMyadmin web application in a Three Tier architecture. The architecture of the project consists of the web tier (ALB), the application tier (php), and the database tier(MySQL RDS).
Network Architecture Consists of:
- A VPC.
- Two public subnets in two availability zones (Web Tier).
- Two private subnets in two availability zones (Application Tier).
- Two private subnets spread in two availability zones (Database Tier).
- Three route tables:
- public web route table that connects the public subnets to an internet gateway.
- private application route table that connect the Application Tier private subnets and a NAT gateway.
- private database route table that connect the Database Tier private subnets and a NAT gateway.
- An Internet Gateway connects an AWS VPC to the Internet.
- A NAT Gateway connects private subnets.
Network Project Steps:
- Create a VPC
- Go to AWS Concolse > VPC > Click Create VPC.
- Give VPC a name and click Create VPC.
- Create Subnets
- Go to VPC > Subnets > Click Create Subnets.
- For VPC ID, Select the VPC created early.
- Create two public web subnets in two AZ.
- Create two private application subnets in two AZ.
- Create two private database subnets in two AZ.
- Create Route tables
- Go t0 VPC > Route tables > Click Create route table
- For VPC ID, Select the VPC created early.
- Create a public web, a private application and a private database route tables.
- Map route table to subnets.
- Create an Internet Gateway.
- Create a NAT Gateway.
- For Subnets choose web public subnets.
- Add a route destination 0.0.0.0/0 in public web subnets and point to Internet Gateway.
- Add a route destination 0.0.0.0/0 in private application subnets and point to NAT Gateway.
- Add a route destination 0.0.0.0/0 in private database subnets and point to NAT Gateway.
Web and Application Tier Project Steps:
- Create jump server EC2 instance
- Go to EC2 > Instances > Click on Launch instances
- Give instance a name for a jump server instance
- Select Amazon Linux 2023 AMI and t2.micro free tier
- Click Create new key pair and download to desktop/laptop
- Select VPC created earlier and public web subnet
- Enable public IP
- Create new security group for jump server security group
- Keep the rest as default
- Click Launch instances
- Create two private php server EC2 instances
- Give instance a name for a private PHP server instance
- Select Amazon Linux 2023 AMI and t2.micro free tier
- Disable public IP
- Create new php server security group
- Click Launch instances
- Create Application Load Balancing (ALB)
- Create ALB Security Group.
- Create Target Group.
- Create Target Group Security Group.
- Use SSH Client to connect to jump server
- One login to jump server, Connect to private PHP sever.
- Follow instruction to install Apache Sever and phpMyAdmin in both private PHP servers.
- Go back to Load Balancing > Target Groups
- Add the two private PHP servers to Target Groups.
- Make sure the instances in healthy state
Database Tier Project Steps:
- Create DB Subnet groups
- Go to Amazon RDS > Subnet groups.
- Give DB Subnet a name.
- Choose two available zones.
- Select the two subnet that we created for the database.
- Create DB instance
- Go to Database, click on Create database.
- Give DB instance indentifier a name.
- Inpute password and confirm.
- Create new DB security group.
- Allow PHP server to connect to DB instance
- Add Custom TCP and port 3306 in DB security group for PHP sever security group.
- Modify the config file in PHP server to point to DB end point
- Use SSH client to login to PHP server.
- Go to phpMyAdmin folder.
- Edit the file config.inc.php.
- Under Authentication section, change localhost to a DB end point.
- Enable Stickiness session due to phpMyadmin is statefull apllication
- Go EC2 > Target group select the target group
- Select Attributes tab > Select Edit and enable Stickiness session